
There are four principal standard test methods for expressing the relationship between hardness and the size of the impression, these being Brinell, Vickers, Knoop and Rockwell. For practical and calibration reasons, each of these methods is divided into a range of scales, defined by a combination of applied load and indenter geometry. Select one of the test methods for more details.
The Vickers hardness tester uses a widely trusted method for measuring hardness across a broad range of materials. Developed in 1924 by Smith and Sandland at Vickers Ltd, the micro Vickers hardness tester method was introduced as a more versatile alternative to Brinell testing.
One of the key advantages of the Vickers method is its consistency: the calculations are independent of the indenter size, and a single diamond indenter can be used for both hard and soft materials. This makes the use of Vickers hardness tester machines or methods suitable for a wide variety of applications.
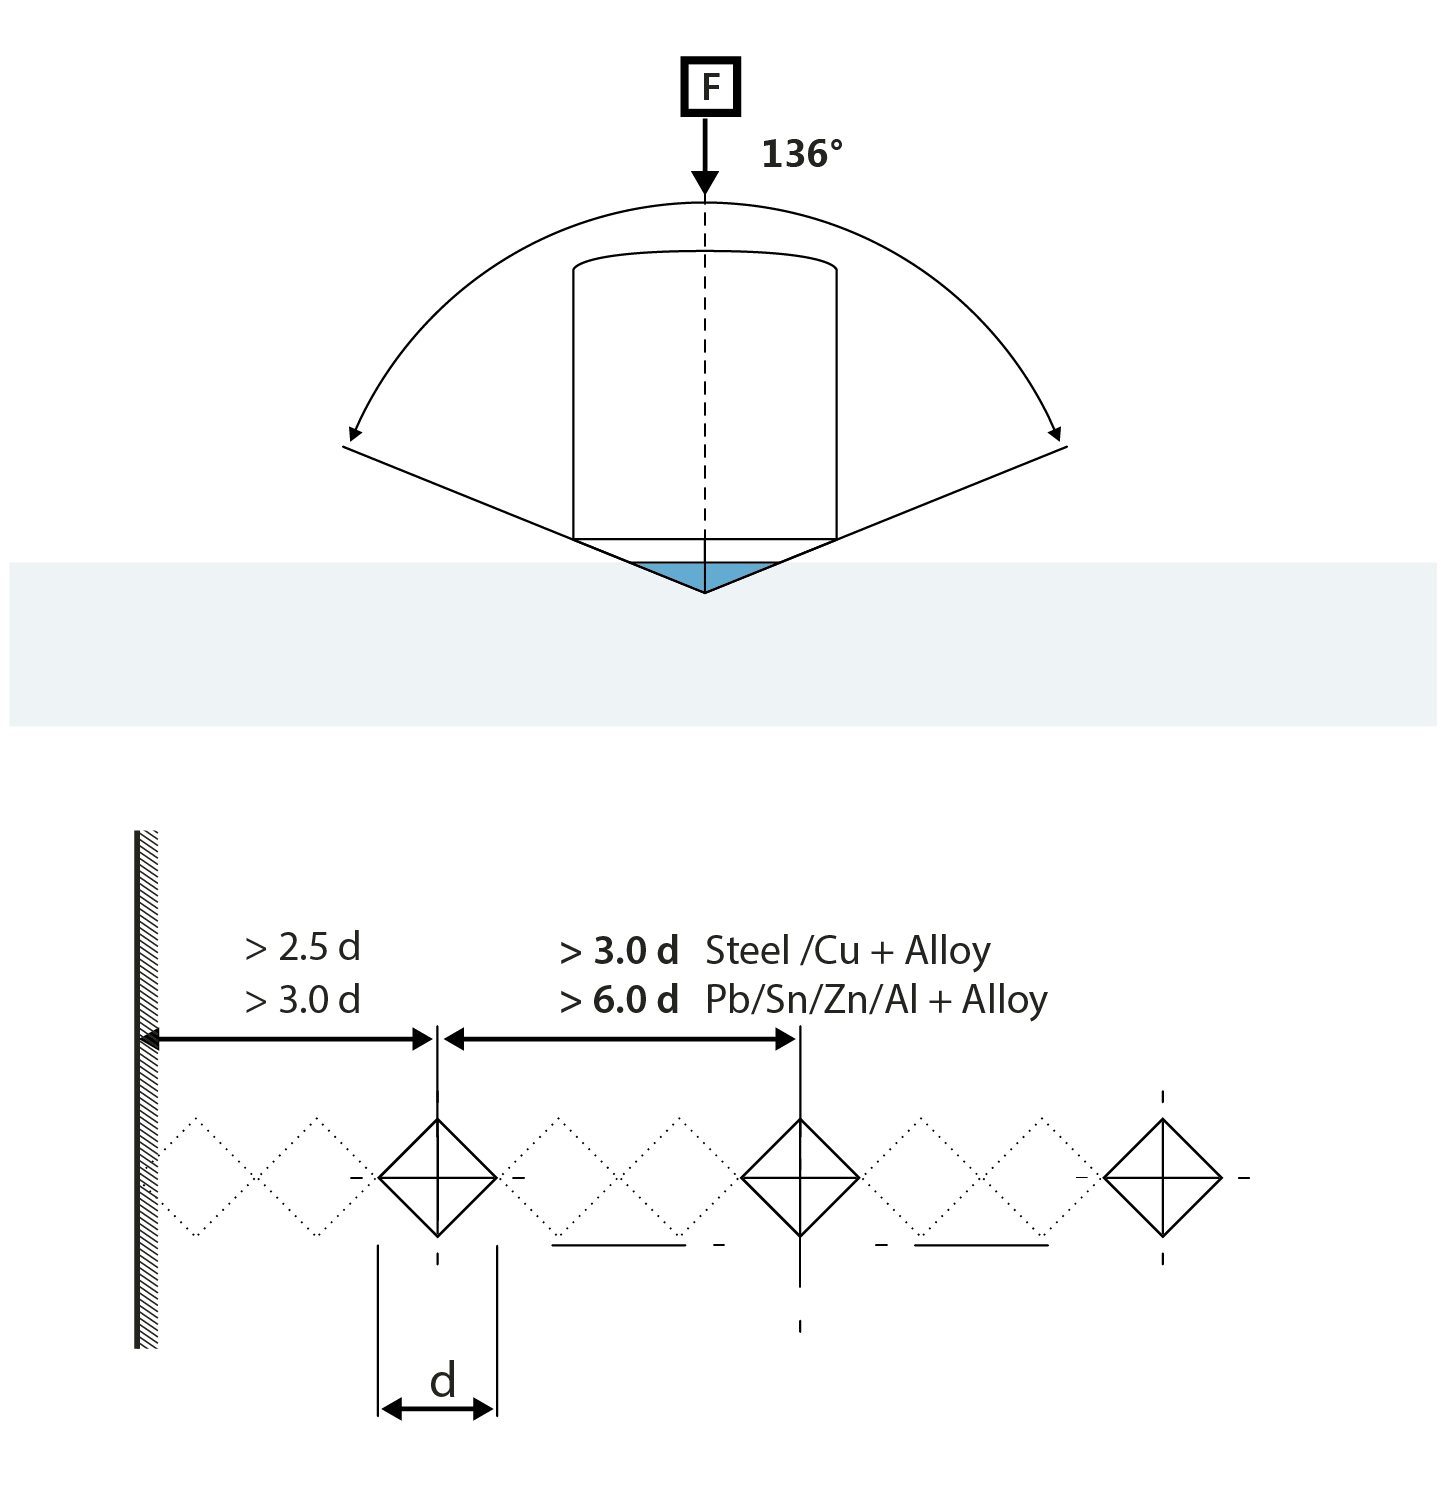
Like other hardness tests, the Vickers method measures a material’s resistance to plastic deformation. It uses a diamond-shaped indenter in the form of a square-based pyramid, which is pressed into the surface of the test material under a controlled load.
An indentation will be left behind after the process, and this is measured diagonally. The result is called the Vickers Pyramid Number (HV), also known as Diamond Pyramid Hardness (DPH). Because of its precision, this test is suitable for assessing both micro and macro hardness.
To guarantee reliable and precise results, the micro Vickers hardness test follows these essential principles:
Vickers hardness values are reported using a standardized format such as xxxHVyy, for example 440HV30, or xxxHVyy/zz, where:
If the dwell time differs from the standard (10 to 15 seconds), it is included as well:
440HV30/20 indicates a 20-second load time.
Vickers hardness testers are used across industries for:
The method is preferred for its ability to provide tensile strength correlations, and insights into wear resistance and ductility. While Vickers results are generally independent of the applied test force (within 500 gf to 50 kgf), care must be taken to space indentations at least three diameters apart to avoid work-hardened interference.
Common fields of use include:
INNOVATEST offers various Vickers hardness testers that are closed loop, load cell-based machines. Our instruments are developed, designed and endurance tested at our R&D facilities, and offer our customers the choice between basic manual testing or fully automatic Vickers testing.
All instruments are equipped with user-friendly, advanced IMPRESSIONS software, which allows for ease of use while accommodating complex applications and workflows. In addition, all critical internal electronic components are manufactured by INNOVATEST, allowing for a high level of manufacturing quality control and ensuring a reliable hardness testing instrument for many years, backed by our extended warranty options.

INNOVATEST Rockwell hardness testers are designed for both standard and superficial Rockwell testing methods. These testers follow the procedures outlined in ISO 6508, ASTM E18, JIS Z2245, the most widely used standards for measuring material hardness globally.
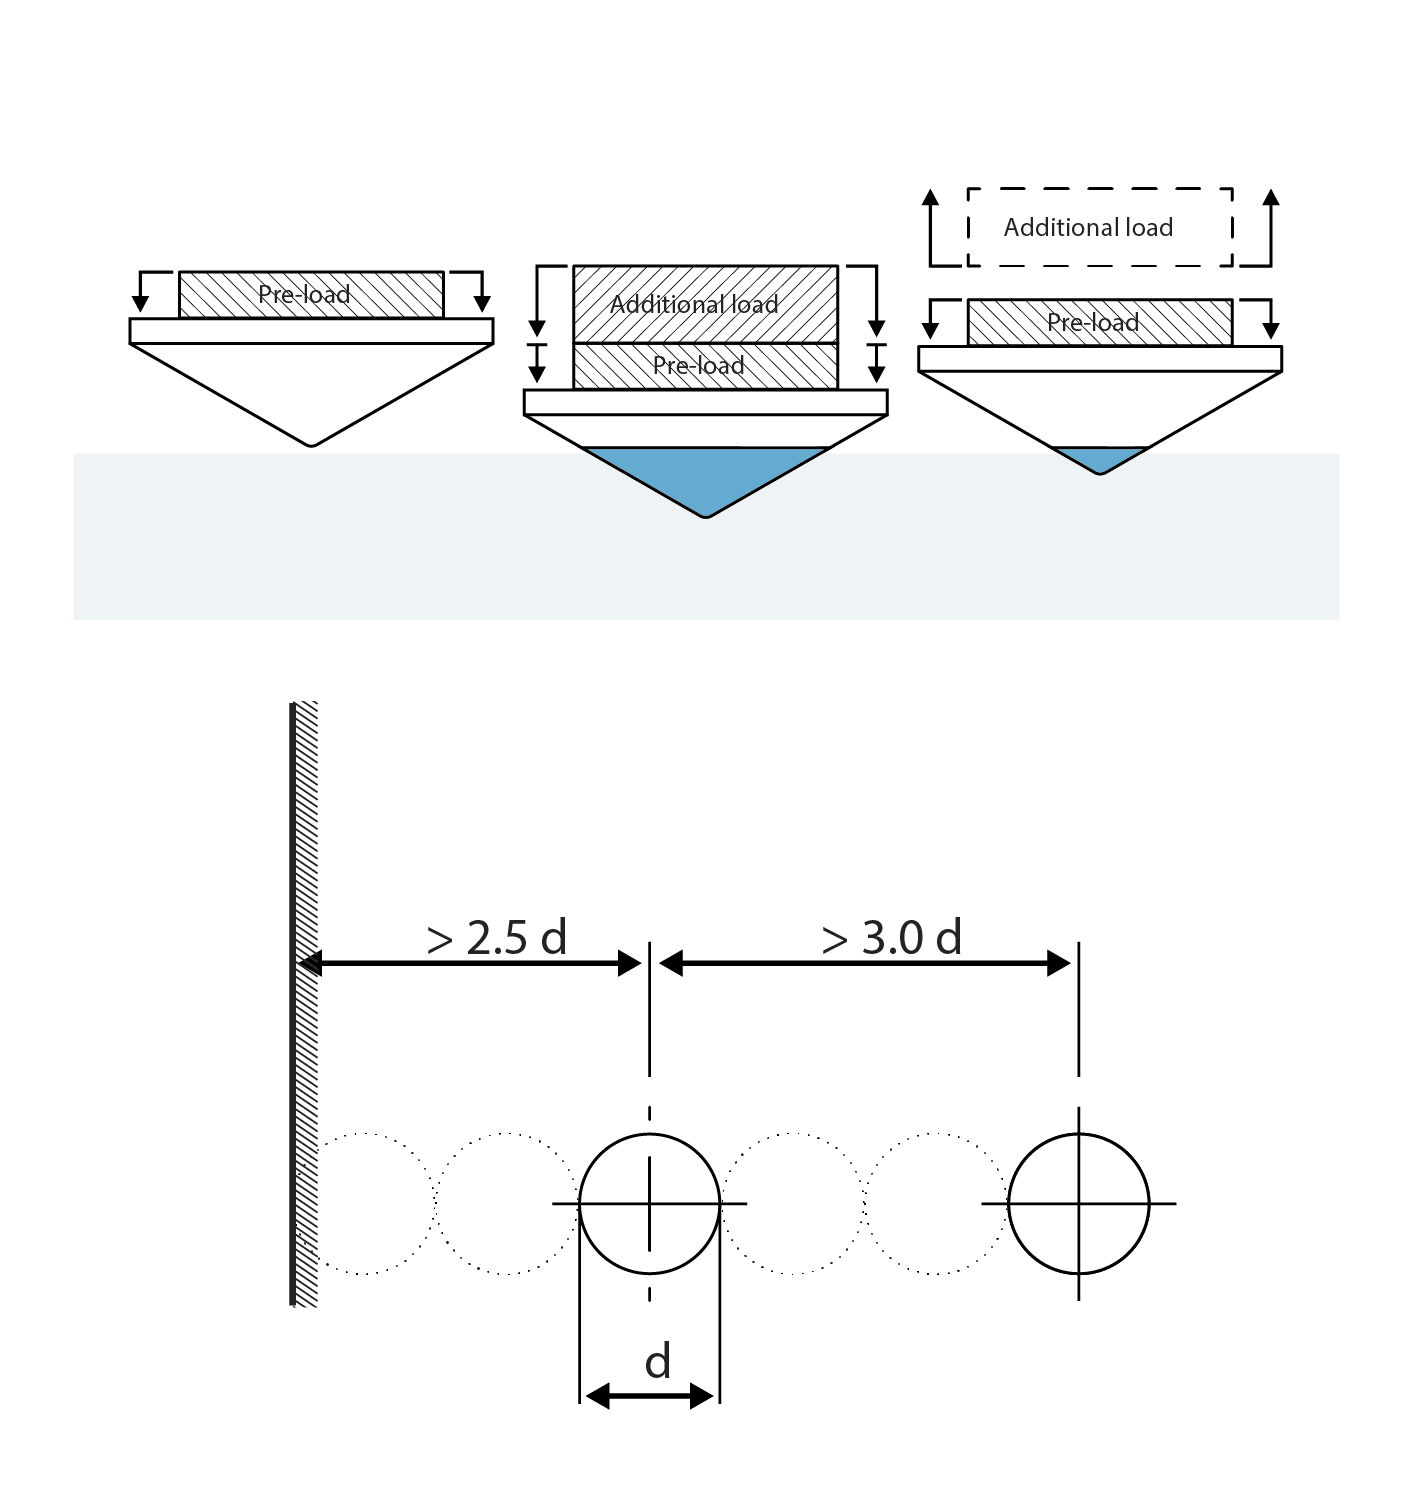
Manual, semi-automatic and fully automatic Rockwell hardness tester methods are applied to a broad range of metals and plastics. The method works by measuring the depth of a permanent indentation created by a defined indenter under a specific (pre) load.
Depending on the material and application, different Rockwell scales may be used, such as Rockwell HRC for harder steels, HRB for softer metals like brass, and superficial scales for thin materials or coatings.
With minimal sample preparation required, the Rockwell test remains one of the fastest and most user-friendly hardness testing methods used across diverse industries. The main advantages of using a hardness tester with the Rockwell method are:
First, a minor load (preload) is applied to establish a zero or reference point. Then, a major load is added to reach the full test force and is held for a set dwell time to account for elastic recovery in the material. Once the major load is removed, the minor load remains in place, and the depth difference from the original reference point is used to calculate the Rockwell hardness value.
INNOVATEST offers various dedicated Rockwell hardness testers that are closed loop, load cell-based machines. Our instruments are developed, designed and endurance tested at our R&D facilities, and offer our customers the choice between basic manual testing or fully automatic Rockwell testing
All instruments are equipped with user-friendly, advanced IMPRESSIONS software, which allows for ease of use while accommodating complex applications and workflows. In addition, all critical internal electronic components are manufactured by INNOVATEST, allowing for a high level of manufacturing quality control and ensuring a reliable hardness testing instrument for many years, backed by our extended warranty options.

The Brinell hardness tester uses the oldest method of hardness testing still in widespread use. Developed in 1900 by Swedish engineer Dr. Johan August Brinell, this technique (standardized as ISO 6506, ASTM E10, JIS Z 2243) is especially suited for measuring the hardness of castings and forgings with grain structures too rough for Rockwell or Vickers testing.
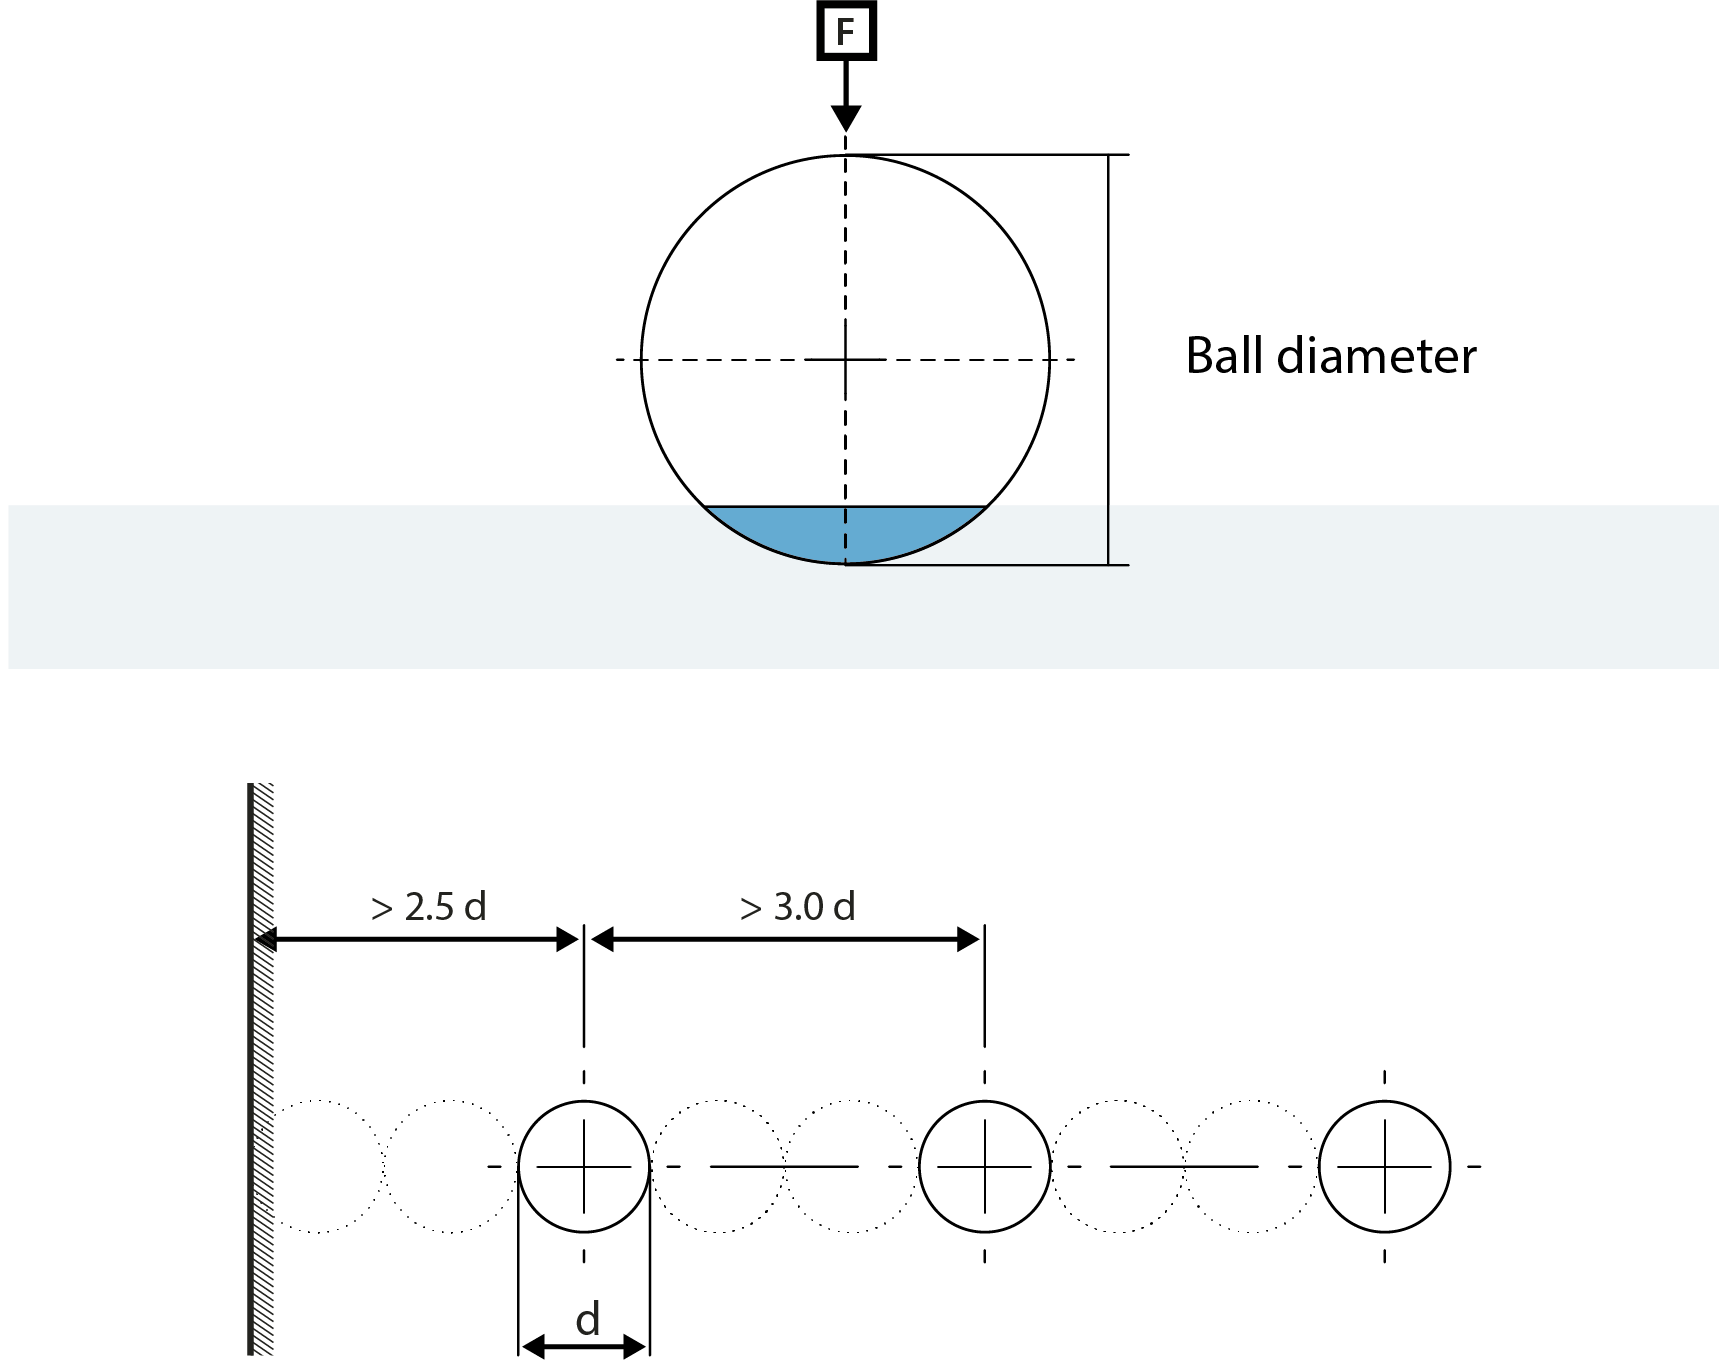
Brinell hardness test conditions have approximately 25 different load/ball combinations. This allows almost all metals to be tested using the Brinell hardness test (HBW) by simply varying the ball size and test force based on the sample’s dimensions and design. The concept is the same whether a digital Brinell hardness tester or a handheld Brinell hardness tester is used. In some cases, as long as the ball size to test the force ratio remains constant, the results are considered accurate when changing between Brinell test conditions.
The HBW Brinell scale (where “H” stands for hardness, “B” for Brinell, and “W” for a tungsten carbide ball) is the most commonly used variant, especially for ferrous and non-ferrous metals.
Results from the Brinell hardness tester are used extensively in industry as a basis for commercial shipment acceptance and quality control. The hardness values obtained from the Brinell test can also provide insights into other material properties, including:
Our Brinell hardness testers can withstand the most harsh environments. If necessary, they can be used with an air filtration system to protect the interior against dust. The testers are available in various formats, including the portable Brinell hardness tester for on-site applications, as well as bench-mounted and floor-standing models for high-precision testing in lab or industrial settings.
INNOVATEST offers various dedicated Brinell hardness testers that are closed loop, loadcell-based machines. Our instruments are developed, designed and endurance tested at our R&D facilities, and offer our customers the choice between basic manual testing or fully automatic Brinell testing.
All instruments are equipped with user friendly, advanced IMPRESSIONS software which allows for ease of use, while accommodating for complex applications and workflows. In addition, all critical internal electronic components are manufactured by INNOVATEST, allowing for a high level of manufacturing quality control, and ensuring a reliable hardness testing instrument for many years, backed by our extended warranty options.

The Brinell test can be simply explained as an indentation hardness test consisting of two basic steps.
Step 1: Indentation
Step 2: Measurement
The Knoop hardness tester is designed for microhardness testing, which refers to evaluating very thin materials, coatings, or brittle samples where only a minimal indentation is acceptable. This hardness testing method uses a low test force and a uniquely shaped diamond indenter to deliver precise hardness measurements at the microscale. The process of testing has been documented in ISO 4545, ASTME92 and JIS B7725.
INNOVATEST Knoop hardness testers, manufactured in the Netherlands, are engineered for accuracy and reliability. We offer one of the largest selections of microhardness testers, backed by expert service and support.
While both Knoop and Vickers tests fall under microhardness testing, they differ in indentation geometry and measurement sensitivity:
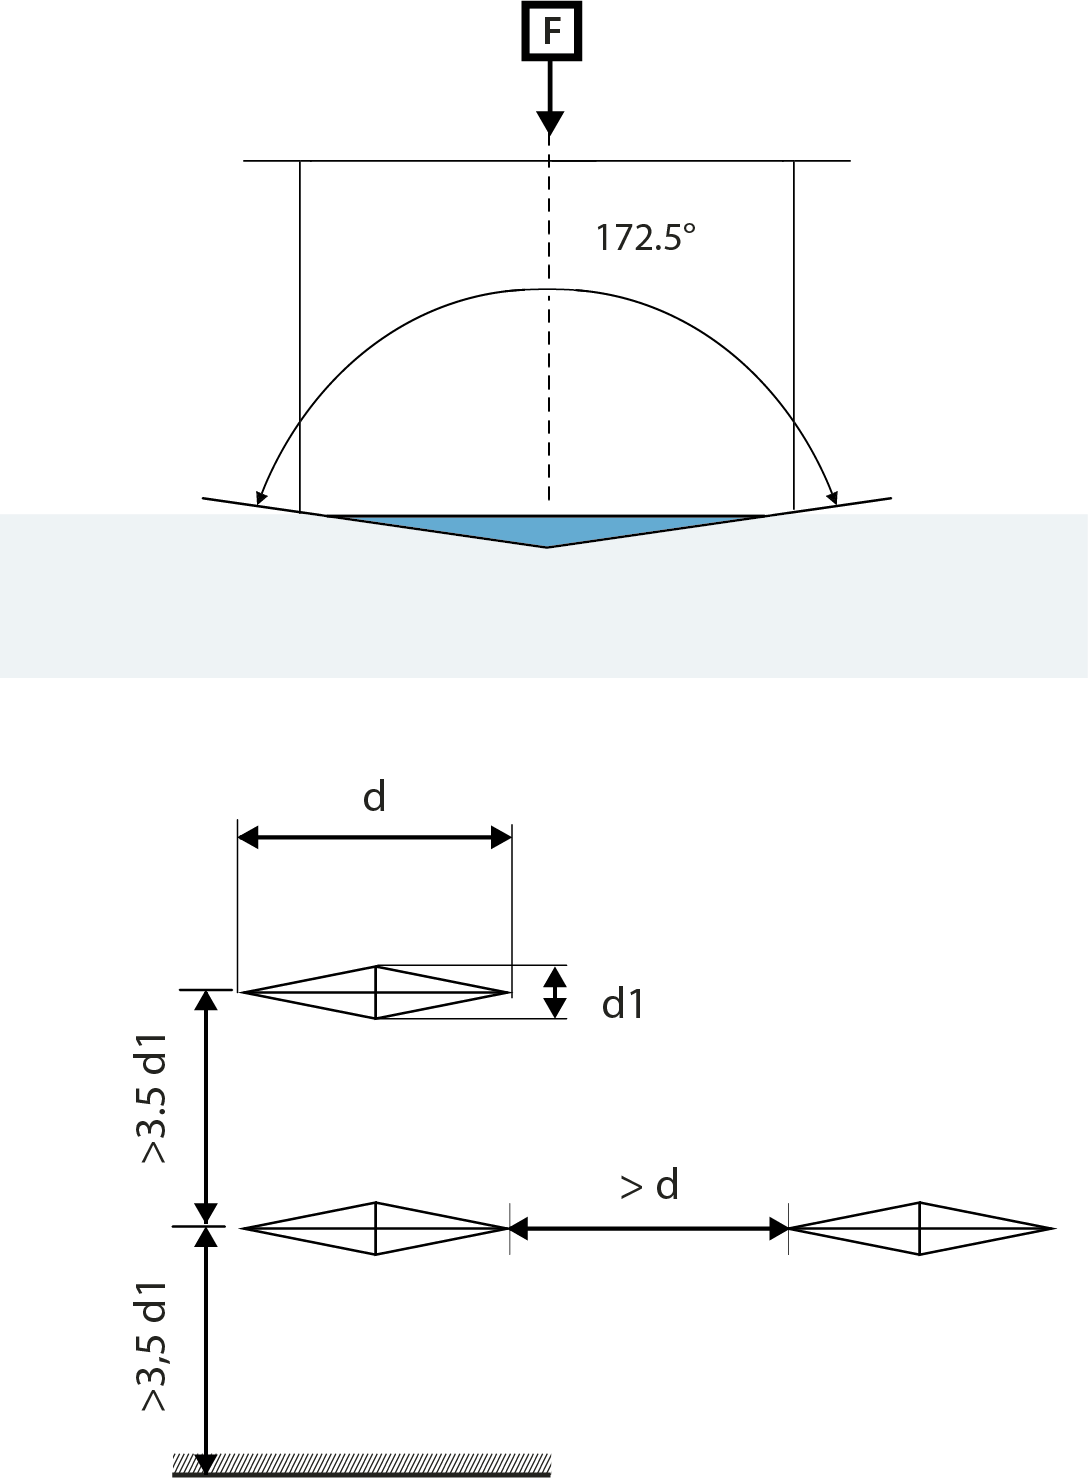
Knoop indentations are elongated and asymmetrical, which allows for more precise hardness mapping over very small distances. Meanwhile, Vickers indentations are square and symmetrical, offering more stable readings at slightly higher forces.
Knoop microhardness testing for thin coatings and soft materials
Knoop microhardness testers are generally preferred when dealing with thin coatings or delicate materials. They’re especially suitable for test forces below 200 gf, where variations in measurement are more likely.
The Knoop hardness test applies a precision diamond indenter with a long and short diagonal, creating an elongated indentation. The test force typically ranges from 10 gf to 1000 gf, though special cases may use up to 2 or 5 kgf.
Knoop is not commonly used to measure bulk hardness, except in specific cases like 500 gf, where ASTM standards provide conversions to other scales. Larger test forces may be used, but variations can happen depending on the material and setup.
The Knoop method is especially valuable for testing the variations of hardness over small features, cross-sections, or surface gradients.
How to prepare samples for Knoop hardness testing
Proper sample preparation is critical for Knoop testing. Surface imperfections such as corrosion, scratches, or deformation can significantly affect results, especially at lower test forces. Removing all surface damage ensures accurate and repeatable measurements.
How to interpret Knoop hardness results
![]()
INNOVATEST KNOOP HARDNESS TESTERS
INNOVATEST offers various hardness testers offering the KNOOP scales that are closed loop, load cell-based machines. Our instruments are developed, designed and endurance tested at our R&D facilities, and offer our customers the choice between basic manual testing or fully automatic Knoop testing.
All instruments are equipped with user-friendly, advanced IMPRESSIONS software which allows for ease of use while accommodating complex applications and workflows. In addition, all critical internal electronic components are manufactured by INNOVATEST, allowing for a high level of manufacturing quality control, and ensuring a reliable hardness testing instrument for many years, backed by our extended warranty options.
